

© Original recipe by The Daily Dishboard ©
😋 Fluffy Garlic Rolls 🌿 Irresistible Side Dish for Every Meal
1. Introduction
If you love the comforting aroma of freshly baked bread combined with the savory kick of garlic, then these fluffy garlic rolls are your new go-to side dish. Whether you’re hosting a dinner party or looking for a simple weeknight addition, these garlic knots or dinner rolls are remarkably easy to prepare and irresistibly delicious. They boast a soft, airy interior with a golden, slightly crispy crust and a punch of aromatic garlic in every bite.
2. Why You’ll Love This Recipe
- Ready in 30 mins — perfect for quick weeknight dinners.
- Soft, fluffy texture that melts in your mouth, enhanced by garlic butter.
- Versatile — great as a side for pasta, soup, or salad.
- Customizable — add cheese, herbs, or spices to suit your taste.
3. Ingredient Notes
The key to truly fluffy garlic bread lies in selecting high-quality ingredients. Use bread flour for a sturdy yet airy dough that captures the perfect texture. Fresh garlic cloves provide a pungent aroma and rich flavor that powdered substitutes can’t match. For the butter, opt for unsalted, high-fat versions to create a luscious garlic butter spread. Fresh herbs like parsley or thyme add vibrant color and wholesome flavor, elevating the overall taste.
4. Kitchen Tools You Need
To make these irresistible garlic rolls, a few essential tools will make the process smoother and more enjoyable. Compact 6-in-1 Digital Air Fryer is fantastic if you want to bake the rolls quickly with even heat and a crispy crust. A sturdy T-fal 14-Piece Hard Anodized Nonstick Cookware Set makes kneading and baking effortless. If you prefer an indoor grill or oven, the Ninja Foodi Smart XL Indoor Grill & Air Fryer is versatile for various cooking styles, ensuring your garlic rolls turn out perfect every time.
5. How to Make Fluffy Garlic Rolls
Preparing the Dough
Start by combining warm water, active dry yeast, and a teaspoon of sugar in a bowl. Let it sit until frothy, about 5 minutes. This step activates the yeast, ensuring the rolls will rise beautifully. Meanwhile, in a larger mixing bowl, whisk together bread flour, a pinch of salt, and a little sugar. Slowly add the yeast mixture and softened butter, mixing until a shaggy dough forms. Knead the dough on a floured surface for about 8-10 minutes until it’s smooth and elastic.
First Rise & Shaping
Place the dough in a lightly oiled bowl, cover it with a clean towel, and let it rise in a warm spot until doubled in size, about 1 hour. It should be puffy and visibly risen. Punch down the dough, then divide it into equal portions. Roll each portion into a tight ball or shape into classic garlic knots — whatever your preference!
Baking & Aromatic Garlic Butter
While the rolls are rising for the second time, preheat your oven to 375°F (190°C). Bake the rolls on a lined baking sheet until golden, about 15-20 minutes. Meanwhile, melt butter with minced garlic and chopped herbs. Once baked, brush your hot rolls generously with this fragrant garlic butter—it seeps into every nook and cranny, creating an irresistible aroma that’s hard to resist.
6. Expert Tips for Success
- Ensure your yeast is fresh — expired yeast can prevent proper rising.
- Use warm, not hot, water — around 110°F to activate the yeast without killing it.
- Don’t over-knead the dough — it should be soft and slightly tacky but not sticky.
- Second rise matters — a warm, humid environment helps develop fluffy texture; cover with a towel.
7. Variations & Substitutions
If you’re gluten-sensitive, try using gluten-free bread flour. For a cheesy twist, sprinkle shredded mozzarella or Parmesan before baking. Vegan options include plant-based butter and garlic-infused olive oil for brushing. Adding chopped herbs, red pepper flakes, or even a sprinkle of nutritional yeast can customize these garlic rolls to your dietary needs and flavor preferences.
8. Storage & Reheating
Store leftovers in an airtight container at room temperature for 2 days or in the fridge for up to a week. To reheat, warm your garlic rolls in an oven at 350°F (175°C) for 10 minutes or use an air fryer for a few minutes until crisp. For maximum freshness, reapply a bit of garlic butter before serving again.
9. FAQ
Can I freeze these garlic rolls?
Absolutely! Wrap the cooled rolls tightly in plastic wrap and place in a freezer-safe bag. To reheat, thaw overnight in the fridge, then warm in the oven or air fryer until crispy and heated through.
What if my dough doesn’t rise?
Ensure your yeast is fresh and the water temperature was correct. A warm, draft-free environment helps dough rise better. If it still doesn’t rise, try adding a pinch more yeast and giving it extra time.
Can I add cheese?
Yes! Sprinkle shredded cheese on top of the rolls before baking for a cheesy garlic bread variation. Cheddar, mozzarella, or Parmesan all work wonderfully.
Are these suitable for vegetarians?
Yes, as long as you use vegetarian-friendly ingredients like plant-based butter and avoid any animal-derived additives.
10. Conclusion
These fluffy garlic rolls are a superb side that elevates any meal with their irresistible aroma and tender texture. Perfectly paired with pasta, salads, or enjoyed on their own, they’re a foolproof recipe to impress friends and family alike. With a few simple ingredients and some handy tools, baking homemade garlic rolls becomes a delightful experience that fills your home with warmth and fragrance.
Print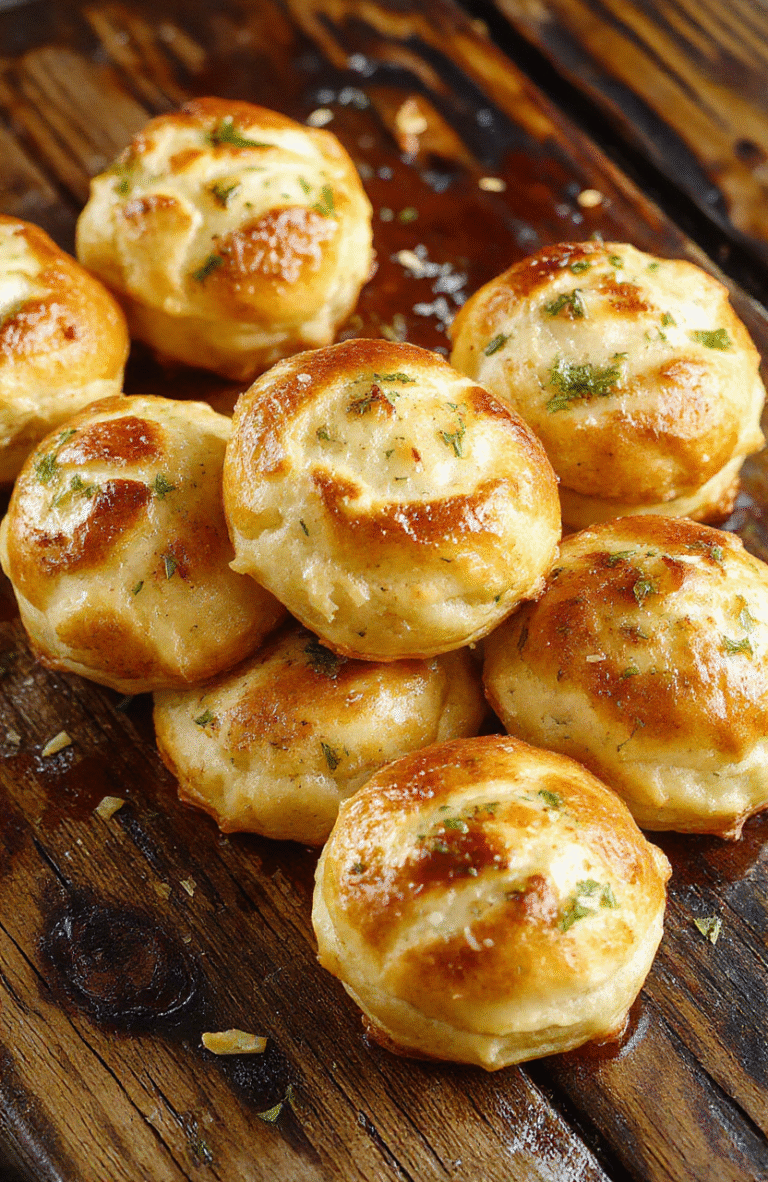
Fluffy Garlic Rolls Easy Irresistible Side Dish
A quick and easy recipe for soft, fluffy garlic rolls, perfect as a savory side dish or snack. Made with simple ingredients, these bread rolls are flavorful, aromatic, and ideal for any meal.
- Total Time: 2 hours
- Yield: 12 rolls
Ingredients
- 3 1/4 cups all-purpose flour
- 1 packet active dry yeast (2 1/4 teaspoons)
- 1 cup warm milk
- 1/4 cup unsalted butter, melted
- 2 tablespoons sugar
- 1 teaspoon salt
- 4 garlic cloves, minced
- 2 tablespoons chopped fresh parsley
- 1/4 cup grated Parmesan cheese (optional)
Instructions
- In a mixing bowl, dissolve yeast in warm milk and let sit for 5 minutes until frothy.
- Add melted butter, sugar, salt, and half of the flour. Mix until combined.
- Gradually add remaining flour, kneading until dough is soft and elastic, about 7 minutes.
- Cover and let rise in a warm place for 1 hour until doubled in size.
- Preheat oven to 375°F (190°C). Punch down the dough and divide into 12 equal pieces.
- Shape each piece into a ball, place on a baking sheet lined with parchment paper, and let rise for 20 minutes.
- Mix minced garlic with a tablespoon of melted butter, then brush over the rolls. Sprinkle with parsley and Parmesan cheese.
- Bake for 15-20 minutes until golden brown. Serve warm.
Notes
- For extra flavor, add grated mozzarella inside the rolls before shaping.
- Ensure the milk is warm, not hot, to activate the yeast properly.
- Prep Time: 15 minutes
- Cook Time: 20 minutes
- Method: Bake, Rise, Mix
- Cuisine: American
- Diet: Vegetarian
Nutrition
- Serving Size: 1 roll
- Calories: 180 Kcal
- Sugar: 3g
- Sodium: 220mg
- Fat: 8g
- Saturated Fat: 4g
- Unsaturated Fat: 4g
- Trans Fat: 0g
- Carbohydrates: 26g
- Fiber: 1g
- Protein: 5g
- Cholesterol: 15mg